With Spring approaching the weather has been warmer. Though it is still chilly here in Montana, it's never too late to start pulling out the capris and shorts. Here is a DIY project to make your very own shorts from old jeans, that can be the exact length you want and won't cost you anything. This is the first in my "DIY shorts series" so if you enjoy this post look foward to 2 more DIY shorts tutorials in the upcoming weeks/months (depending on how fast I can get them posted!) Enjoy(:
Step 1: Find some jeans or capris you don't wear anymore or you don't mind cutting up. Put on your jeans and use chalk or a pencil to mark where you want to cut them. Keep in mind, we will be fringing them later, so they will get a little shorter.
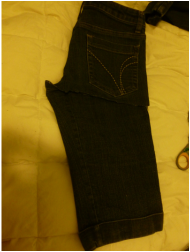
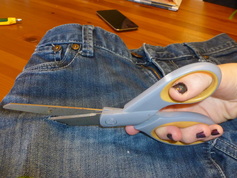
Step 2: Take off the shorts and cut them. Cut longer rather than shorter, because you don't want to accidently cut them too short. I recommend cutting them in a slanted line, making the back longer than the front. To make them even, cut one side and fold them in half to cut along the first cut (showed in the picture.) Once you have cut them, try them on again. Mark where you want to cut off more and repeat as before until you have your jeans cut to your liking.
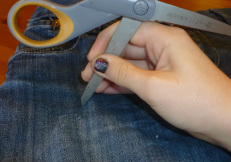
Step 3: Time to distress these bad boys! Grab your sissors and open them up slightly to use the pointy part. Start dragging it across the shorts anywhere you want it to be slightly distressed. Scuff up your shorts as much as you want! Remember, this will be much more noticeable after you wash and dry them.
Step 4: If you want your shorts to make holes in them fold the fabric of the front part of the shorts in half and cut a tiny slit. Slide your sissors into the slit and cut as much as you want. Make sure to avoid cutting the pockets, or cutting big holes in the back of the shorts. You wouldn't want you underwear showing through! Unless you want huge holes, don't get too crazy cutting. The dryer will make them bigger and much more frayed.
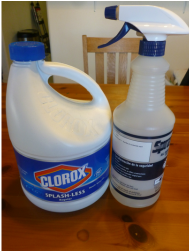
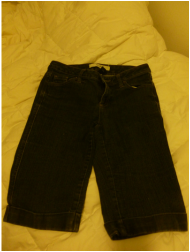
Step 5: (If you want to leave your shorts their natural color then skip to step 7!) Now it's time to wash out the color! Fill an empty spray bottle half way full with bleach and add a little water.
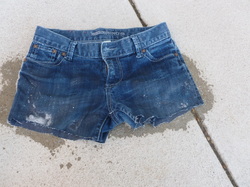
Step 6: We want a slightly ombre effect, where the jeans are lighter near the legs and get darker up to the waist. To achieve this, spray your shorts with the bleach focusing mainly on the bottom part where your legs would come out. Once the bottom is soaking start spraying upwards. Spray your shorts less as you work upwards. Repeat this on the backside and lay them in the sun to dry.
Step 7: I layed my shorts out for about 5 hours.Once your shorts are dry, bring them in. As you can see, they are lighter near the bottom from the bleach and get darker as they go up. Now, put your shorts in the wash, and wash them with cold water. Once you wash them, put them in the dryer.

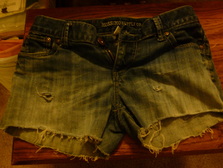
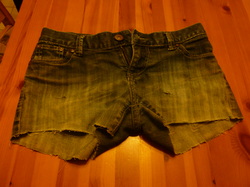
Step 8: After you have washed and dried your shorts they should be frayed and more distressed. You can trim extra fray that you don't want, or go back with your sissors and fray them more. Overall, these are your completed DIY distressed cut-off shorts! I think they are super cute and you can personalize them as much as you want by adding studs or whatever you want! I hope you enjoyed this tutorial! Leave suggestions for other DIY crafts you want me to post on!
 RSS Feed